
This is a photo-free tutorial, so if you get confused or need any actual photos just let me know. Sooner than later, I would like to write up a tutorial with screen shots, so just keep any eye out for that.
Open up your photo-editing software - I use PSE 7. Open the png file you want to cut out. Save it as a jpg file (I usually just save mine to my desktop so it's easy to find later on in the process). Then while still on the screen, add a new layer and fill with your paint bucket the color black. Control-G to group with the previous layer . Save the black version as a jpg file.
Open Robo Master software. Create a new document. Then click Insert>File. Find the jpg file (the non-black version) you just saved. Then click anywhere on the work area to place the element. NOTE: some jpg files open just fine in this program. I have come across a few that I've saved that don't want to open for some reason. Simply open the file in Microsoft Paint (or some other editing software) and save it as a jpg again. I've seen some places online say they don't know why it does this. Oh well - at least there is a fix! Then resize the element to your desired size (lower right hand corner in Robo Master software tells you the measurements).
Next, right-click on the element and click 'get outline.' In that new screen, click on File>Load Image. Open the black jpg you saved earlier. Sometimes I have to play around with the 'threshold' setting in order to get a good outline of the element. Then click 'convert to outline' and 'paste to exit.' Now sometimes I can do all of that and the element just shows up automatically on the screen, the past few times I've had to place the element on the page myself and line it all up. Either way will work. Once done with that, save it as a .gsd file.
Open your Silhouette Studio Software. Create new document: File>New. You can adjust the size of your document by clicking on the red square icon (top far right side of the window). Then File>Open. Find .gsd file you just saved. Place it on your work area and voila! You may have to monkey around with the registration marks (top far right side of the window). I always try to make mine within the printable area b/c otherwise the Silhouette won't detect them and will cut everywhere but where you want to cut it (unless you're really lucky).
Before you send to your printer and Silhouette, make sure you change the Silhouette cut settings (top far right side of the window) so it's right for the type of paper you are using, etc. Send to your printer, then place on the carrier sheet, and then send to your Silhouette.
Showing posts with label Tutorial. Show all posts
Showing posts with label Tutorial. Show all posts
Tuesday, January 11, 2011

Monday, November 8, 2010
Turkey Tutorial
Want a little kid friendly craft to add to your Thanksgiving decoration stash? Take your digital scrapbook supplies and turn them into this:


I made this little turkey for The Hybrid Chick's Digital Scrapbook Day Hybrid Challenge and now I'm going to show you how incredibly easy he was.
First, print off the digital papers you are going to use on to matte presentation paper. I used the awesome designer collab Season of Thankfulness from The Digichick.

Take an empty container (you could even use an empty toilet paper roll) and clean it out. I used an empty spice container:

Then I drew on the back of each of the five papers that were to be feathers and cut them out and assembled. I used red line tape to attach them together.


Then I attached the paper around the spice container:

Finally, I assembled the turkey and added some wings and facial features.

Now the turkey sits on my dining room table. If I happen to get any more empty containers in the next few weeks I am definitely going to have my kids join in and help me make some more. They are that easy!

Monday, October 11, 2010
Halloween Vial Treat Holder
Head on over to The Hybrid Chick today and check out my blog post on how to make this cool treat holder for a vial full of candy!
.jpg)
.jpg)
Wednesday, October 6, 2010
Treat Bags
I joined in with Joana over at The Hybrid Chick for her treat container hybrid challenge. I decided to use one of Arty Pants Digital Stamps new stamps - Witch Girl. I have never used a real stamp in my life before, well at least for card making, that is, and I'm not about to go out and buy any now that Arty Pants offers digital stamps! These are so easy to use - you can either print them off and color them with markers, pencils, etc., or color them digitally on your computer! I chose the latter. I used Laura Banasiak's Pumpkin Spice kit and clipped the papers to the different layers of the Witch Girl. For a great tutorial on how to use the digital stamps, see this post over at The Hybrid Chick by Dalis. For the finishing touch, I added in a cutesy saying "Hauntingly Sweet" with DJB Woke Up Late font from Darcy Baldwin.
First off, I took some of these paper sacks and used my Big Bite to punch some holes in the top of both the printed off stamp and the sack. I overlapped the printed image in the back by about 1.5 to 2 inches.


First off, I took some of these paper sacks and used my Big Bite


I then added some ribbon and tied it off.

An easy way of making some plain ol' bags cute!


One more thing - Darcy Baldwin (the resident fontographer) at Sweet Shoppe Designs is having her second ever "So You Think You Can Font?" contest!

Have you ever wanted to see your handwriting made into a font? This is your chance! You never know if she'll pick yours!
Wednesday, September 22, 2010
Halloween Button Bauble & Tutorial
Kristin Cronin-Barrow (a designer at Sweet Shoppe Designs) is turning 30 this week and she's having a week-long celebration with various giveaways and stuff. One of the challenges is to create a layout or project with either 30 flowers or 30 buttons on it. The winner will receive a month long guest spot on her creative team. I decided to take mine hybrid and use one of those empty baubles that are starting to pop up in the craft stores for the upcoming holidays. While shopping for the bauble, I found this fun and cute ribbon with green, orange, and black polka dots on it. I had found my color inspiration!

So, in keeping with the orange, green and black colors, I took some different papers from various kits (the darker orange is from All Star, the lighter orange and green are from Artist's Canvas, and the gray is from her contribution to the Sweet Shoppe collab freebie Simple Pleasures) and printed them off on matte presentation paper.

Then I used one of the small circle paper punches I have and cut out a handful of them. I don't have a smaller circle paper punch, so I took a round object and traced it and then hand cut it out. Talk about tedious work! 60 small circles in all because I wanted the buttons to be double-sided. I used my good old Tombow adhesive to create the double-sided buttons.

Then I took one of my most favorite hybrid utensils - the paper piercer - and poked holes in the buttons so I could later thread them. FYI, I use the back side of a mouse pad as a mat so I don't poke a hole in anything below the button.

Then came thereal fun part: hand stitching each and every button to make it look like a true button. 30 buttons in all. See! For this, I used a needle and embroidery floss.

.jpg)


So, in keeping with the orange, green and black colors, I took some different papers from various kits (the darker orange is from All Star, the lighter orange and green are from Artist's Canvas, and the gray is from her contribution to the Sweet Shoppe collab freebie Simple Pleasures) and printed them off on matte presentation paper.

Then I used one of the small circle paper punches I have and cut out a handful of them. I don't have a smaller circle paper punch, so I took a round object and traced it and then hand cut it out. Talk about tedious work! 60 small circles in all because I wanted the buttons to be double-sided. I used my good old Tombow adhesive

Then I took one of my most favorite hybrid utensils - the paper piercer

Then came the

By this time, my oldest son was home from preschool, so he helped me insert the buttons, along with some black Halloween crinkle (as the bag said) that I got from Michael's into the bauble.
.jpg)
And voila! The finished product! And yes, there are 30 buttons in there - it is kind of hard to photograph all 30 of them in a round object!

Sunday, July 11, 2010
So proud!
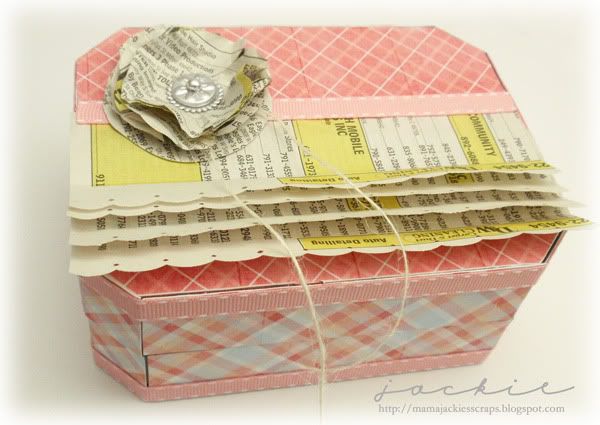
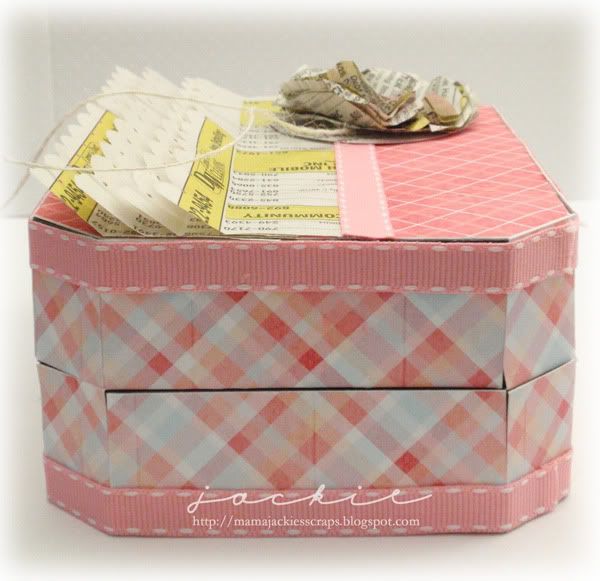
I just have to share my latest creation for the July Portfolio at Sweet Shoppe. It's a trinket box and I just adore it! I used Traci Reed's 'When You're Smiling' kit and am so glad. The colors are just perfect!
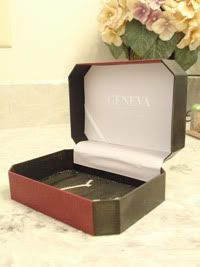
Believe it or not I had this box just laying around! It used to have some watches in it.

After figuring out what papers I wanted to use in Photoshop Elements , I printed off all the supplies I'd need from Traci's kit and got to work measuring and cutting. Then I mod podged
 the pieces of paper on and let dry. While it was drying, I started working on the phone book flower. I am actually doing a blog post at The Hybrid Chick this coming Friday (the 16th) about how to make flowers out of an old phone book - so keep an eye out for that! I also worked on the scalloped edge with my edge punch and laid it all out how I wanted it. I also measured the ribbon to go around the entire outside of the box and adhered it with red line tape
 . I added some small embellishments and some twine to the flower and voila! This is the finished product!


Believe it or not I had this box just laying around! It used to have some watches in it.
Thanks for looking and happy crafting!
Subscribe to:
Posts (Atom)


